Setup
Required programs
First and foremost you'll need a bunch of programs installed:
- an IDE, Eclipse, IntelliJ or VSCodium are the most commonly used ones
- note that for VSCodium you will most likely want to install some extensions for Java development
- Java 17 JDK is also mandatory for development, if you don't already have an JDK installed I recommend installing Temurin
- Forge 1.20.1 MDK, which you can download from
here
- for these docs we will be using the latest version, which at the time of writing is 47.4.10
Setting up the JAVA_HOME variable
On Linux this is simply done by adding export JAVA_HOME=<path>;export PATH=$JAVA_HOME/bin:$PATH do your
.bashrc/.zshrc or similar file, where <path> is the location of the JDK.
On Windows you need to:
- Search for "Environment Variables" and click on "Edit the system environment variables"
- On the bottom right corner, click on the "Environment Variables..." button
- Under "System variables" list click on the "New..." button
- The variable name needs to be JAVA_HOME (all caps), the value needs to be the path where you've installed the JDK.
- Click "Ok"
You can also directly set it up via the Command Prompt by running the following command setx /m JAVA_HOME "<path>"
where <path> is the location of the JDK.
Be extra careful when adding new environment variables as this could potentially have negative effects on your whole desktop if done wrongly or if you delete things by mistake!
Checking if everything works so far
You can check the currently installed Java version by using the following command: java -version.
At this point you should also start your IDE of choice to see if everything works and to install additional extensions if you want/need to.
Configuring gradle
After unarchiving the MDK to your desired location we will work with 2 main files for this step:
build.gradle, found in the root directory of your projectmods.toml, found in/src/main/resources/META-INFfolder.
The following are changes you need to do to add Mine Mine no Mi as a dependency and start using its code, however it is
NOT a full explanation of how the entire build.gradle or mods.toml files work.
build.gradle changes
For the first file, go to the runs block where you'll have a configureEach block, in it after all the default
properties that come with the MDK add the following 2 lines:
property 'mixin.env.remapRefMap', 'true'
property 'mixin.env.refMapRemappingFile', "${projectDir}/build/createSrgToMcp/output.srg"
This will ensure the your setup won't crash on startup due to Mine Mine no Mi's mixins.
Now we have a choice to make, we can add the mod as a dependency using either cursemaven (for curse), modrinth maven (for modrinth) or using a local jar file.
Curse and Modrinth work equally well with the only differences being:
- only modrinth maven is official, cursemaven being a community effort
- modrinth's dependency string is more straight forward and easier to read
The local version is more so meant if you can't use these services, if they're down or if the mod is not available on either.
You only need one of them, either modrinth, curse or local, you do not need to set them all up.
modrinth maven
Further down there's a repositories block, under it we'll want to set up
modrinth's maven repository by adding the following
block:
maven {
	url = "https://api.modrinth.com/maven"
	content {
		includeGroup "maven.modrinth"
	}
}
We will be using it to setup the Mine Mine no Mi for your project.
Immediately below we'll have a dependencies block where we actually need to setup the Mine Mine no Mi as a dependency
by using the following line:
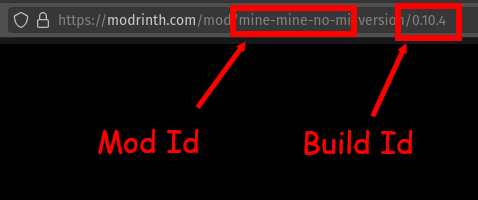
implementation fg.deobf("maven.modrinth:mine-mine-no-mi:1.20.1-0.11.4")
To break down the above:
mine-mine-no-miis Mine Mine no Mi's project id on modrinth1.20.1-0.11.4is the version id which we are using for this. When you want to update to a newer version of the mod you will need to change this id to the latest build released on modrinth
More info about setting these up and how to find these ids on modrinth maven
cursemaven
Further down there's a repositories block, under it we'll want to set up cursemaven's
repository by adding the following block:
maven {
    url "https://cursemaven.com"
    content {
        includeGroup "curse.maven"
    }
}
We will be using it to setup the Mine Mine no Mi for your project.
Immediately below we'll have a dependencies block where we actually need to setup the Mine Mine no Mi as a dependency
by using the following line:
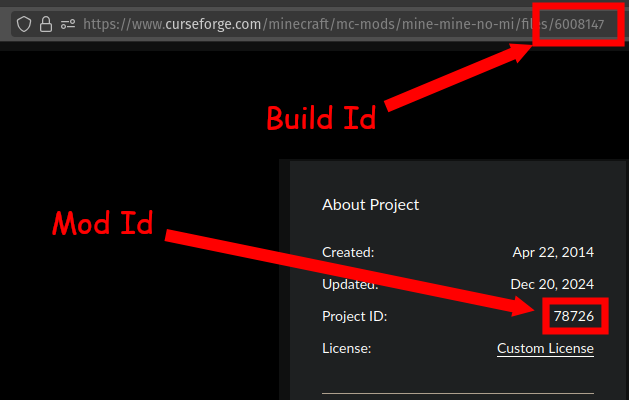
implementation fg.deobf("curse.maven:mmnm-78726:8324322")
To break down the above:
- the
mmnmstring doesn't really matter, its up to you and its used for easier identification 78726is Mine Mine no Mi's project id on curse8324322is the build id which we are using for this. When you want to update to a newer version of the mod you will need to change this id to the latest build released on curseforge
More info about setting these up and how to find these ids on cursemaven
local
There's also a third option, using a local .jar file.
First of all you need the .jar file, which for the generic purpose of this tutorial we're going to name
mine-mine-no-mi.jar.
In the root of the project create a libs folder, drop the jar in there and link it in build.gradle as such:
repositories {
    flatDir { dirs 'libs' }
}

dependencies {
    implementation fg.deobf(files("libs/mine-mine-no-mi.jar"))
}
Set a dependency for Mine Mine no Mi
The last step is in the mods.toml file, where we need to add Mine Mine no Mi as a dependency (this is technically
optional however it does help with errors and ordering, so its good to do it)
At the very bottom of the file add the following block:
[[dependencies.<modid>]]
modId = "mineminenomi"
mandatory = true
versionRange = "[0.10,)"
ordering = "NONE"
side = "BOTH"
Where <modid> is your project's id set in the same file as modId.
In practical terms this will make it so if somebody installs your addon without Mine Mine no Mi, instead of a generic error they will receive a screen telling them that Mine Mine no Mi is needed in order for this to run.
Helping both them, and you, in tracking the cause of their issue. The ordering parameter can also be used to define if
the mod should be loaded BEFORE or AFTER your own, in most cases however this will not be need, so leave it as
NONE.
Finishing the setup
Once everything is done you can run the setup task:
- Eclipse:
gradlew eclipse genEclipseRuns - IntelliJ:
gradlew idea genIntellijRuns - VSCode/VSCodium:
gradlew genVSCodeRuns
If everything built successfully then the setup is finished, open your IDE of choice and import the project in it:
-
Eclipse:
- File -> Import
- Select
General/Existing Projects into Workspace - In the "Select root directory" field browse and select the new project
- Make sure its marked under the "Projects" list
- Finish
-
IntelliJ:
- File -> New
- Project from existing source...
- Click the build.gradle
- You can alternatively open it as a project folder with the windows extension and it should start importing it automatically.
-
VSCodium:
- File -> Open Folder
- Browse to where your project is located and open it
Give it a run first and see if both your mod and Mine Mine no Mi are loaded correctly and if there's no crash on startup.